A Tribute to Charles E. Harris - Pioneering Early Supporter of DIC
February 13, 1950 — January 29, 2024
Dr. Michael A. Sutton remembers his friend, Dr. Charlie Harris.
Introduction
Few people know that it was my friend, Dr. Charles E. Harris (he was Charlie to me and to his colleagues), who envisioned the future of non-contacting, full-field, three-dimensional measurements for curvilinear structures. It was this initial vision along with early financial (and moral) support that created the possibility for the development of digital image correlation (DIC) technology - one of the most significant advances in measurement science in over a century. As one of the individuals who benefited from Charlie’s commitment to this vision, I would like to share the story so that everyone is aware of his contributions.
Background
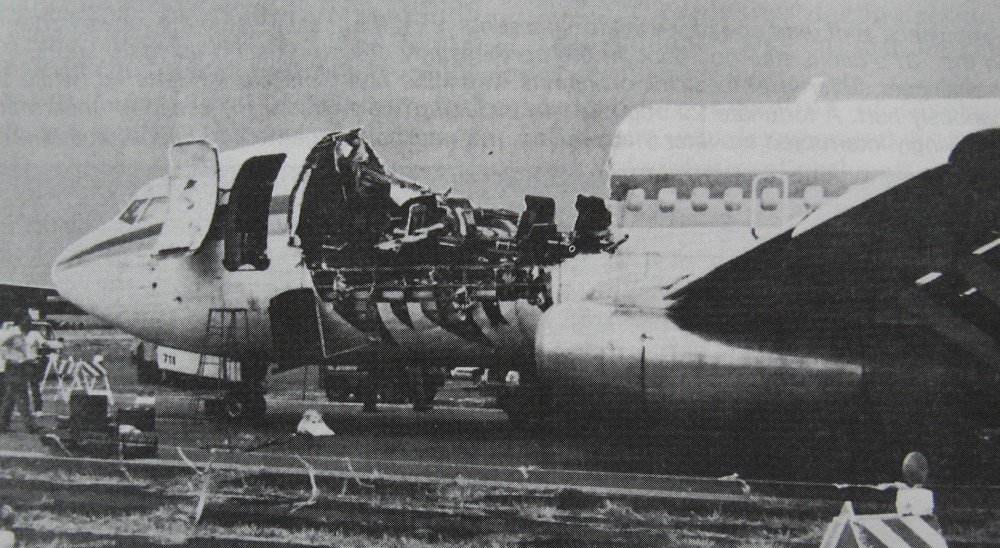
After graduating with a Ph.D. from Virginia Tech in 1983, Charlie accepted a faculty position at Texas A&M University. After a short stint in College Station, Charlie headed back to Virginia and accepted a position as head of the Mechanics and Materials Branch at NASA Langley in 1987. Shortly after he took this position, on April 28, 1988, the top portion of Aloha Airlines Flight 243 separated and blew off the aircraft, resulting in the loss of a stewardess. Since the reason for failure was unknown, and Boeing 737 aircraft were in service throughout the world, NASA and other federal agencies initiated the Aging Aircraft Program to understand the reason for the failure and develop methods to improve flight safety.
Aging Aircraft Program at NASA Langley
Since NASA Langley was one of the NASA’s structural mechanics centers, and the Aloha accident was clearly a structural problem, it was natural for Langley to take a significant role in the Aging Aircraft Program, and Charlie’s branch took a leadership role in the effort. Since the source of the failure was unknown, there was a critical need to obtain measurements on large areas of aircraft structures to identify those regions most likely to be the source of the Aloha failure. One of the issues that arose during these early discussions was the lack of a field-capable, full-field, three-dimensional surface deformation measurement systems for curved structures, such as an aircraft fuselage. Though the obvious need for such a system was recognized by Charlie and others, no methods existed at that time to make the necessary measurements.
Sabbatical at NASA Langley
Though I was unaware of the rapid growth in NASA’s Aging Aircraft Program, I contacted Charlie to see about the possibility of going to NASA Langley for my first sabbatical leave. I had written a proposal to obtain funding for the visit, but it was not approved. It was at that point that Charlie provided the necessary funding through NASA. It was during my sabbatical (May 1992 to August 1993) that I became aware of the scale of the research efforts underway at NASA and other agencies to understand the fundamental reasons for fracture and failure of the Aloha Boeing 737 aircraft. Working with colleagues at NASA to understand fracture of the aluminum used in fuselage structures, I implemented a 2D DIC system to measure crack tip displacements during mixed mode loading. When I saw that the crack could fail in shear under mixed-mode loading, and showed Charlie the DIC measurements, he was quite skeptical. He asked me to perform another experiment so that he could personally observe what happened. Well, we ran the same experiment and, as expected, the crack began to grow in shear under mixed mode loading, with the surfaces sliding across each other, as my DIC measurements confirmed. It was at this point that Charlie realized the DIC methodology had potential to transform the measurement process.
The Meeting
The next day, Charlie asked me to visit him in his office. He asked me whether the DIC method could be extended to measure the full, three-dimensional deformations of fuselage structures. I then explained that myself, Professor Yuh J. Chao and Prof. Stephen McNeill had developed a “laboratory scale” stereovision system at the University of South Carolina and used it to make measurements on a cracked specimen. However, the current version would have to be completely re-developed since the system was not capable of field measurements due to its construction and the way it was calibrated. Charlie then asked me to write a proposal to develop a field-capable, stereovision DIC system to measure the deformations of an aircraft fuselage structure, which Charlie funded. Though I do not remember the exact date, the meeting was in late 1992, and it changed the landscape for full-field measurement technology.
Working with a Ph.D. student, Jeffrey Helm, who wrote the software and developed a target-based calibration system, the first field-capable, stereo DIC measurement system was completed in late 1994. With support from Charlie, the system was transported to Boeing in Seattle, Washington in late January 1995. During an intense, week-long set of experiments, Professor McNeill, Jeff Helm, and I obtained the first-ever, full-field, stereo DIC measurements on a Boeing 727 test article undergoing combined pressurization, bending and torsional loading in early February 1995. The success of these experiments confirmed DIC technology could be used to make accurate, full-field, three-dimensional deformation measurements on fuselage structures.
The Aftermath
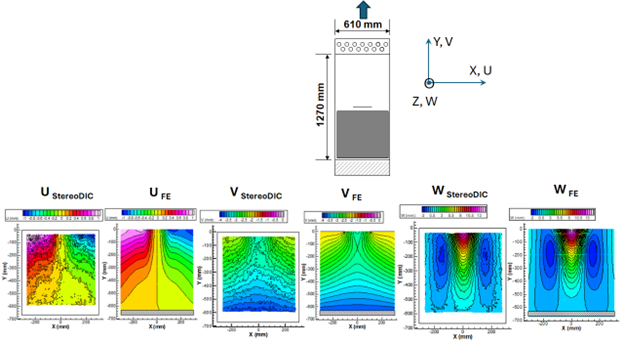
Though the initial experiments were successful, computer processing time for hundreds of large images took several months to complete in the mid-1990s. Since the processing time was so long, the technology was not adopted by the aerospace industry for over a decade. However, to demonstrate the potential of the method for use in large structural components with flaws, Dr. Helm spent time at NASA Langley in the late 1990’s to perform tensile tests on center crack panels undergoing tensile loading. Using the measured displacements on the top of the panel as input to the finite element analysis (the panel slipped slightly, requiring stereo DIC measurements as model boundary conditions for comparison to predictions), the results are shown to the right, confirming that the stereo DIC method can measure full-field deformations on large structures undergoing fully three-dimensional deformation.
Today, 3D DIC technology is used in a wide variety of engineering applications worldwide due to its robustness, accuracy, speed, and field-capability. Looking back to my time at NASA Langley, it was the vision and foresight of my friend and colleague, Dr. Charles E. Harris, that resulted in the development of one of the most important measurement technologies used around the world today.


